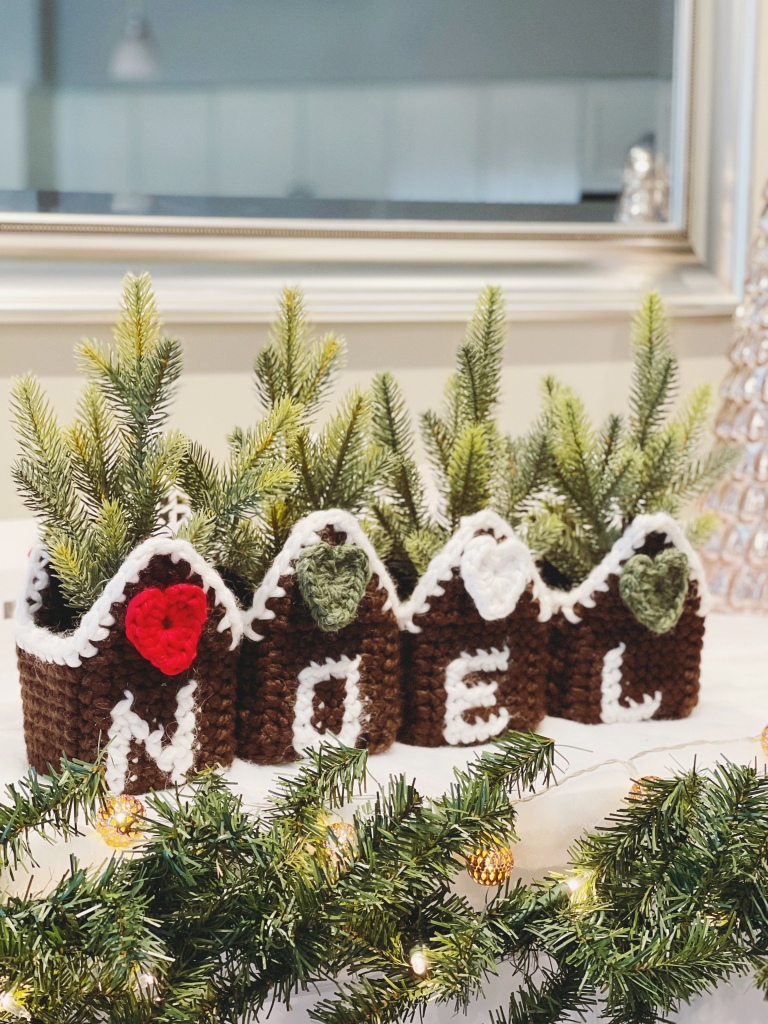
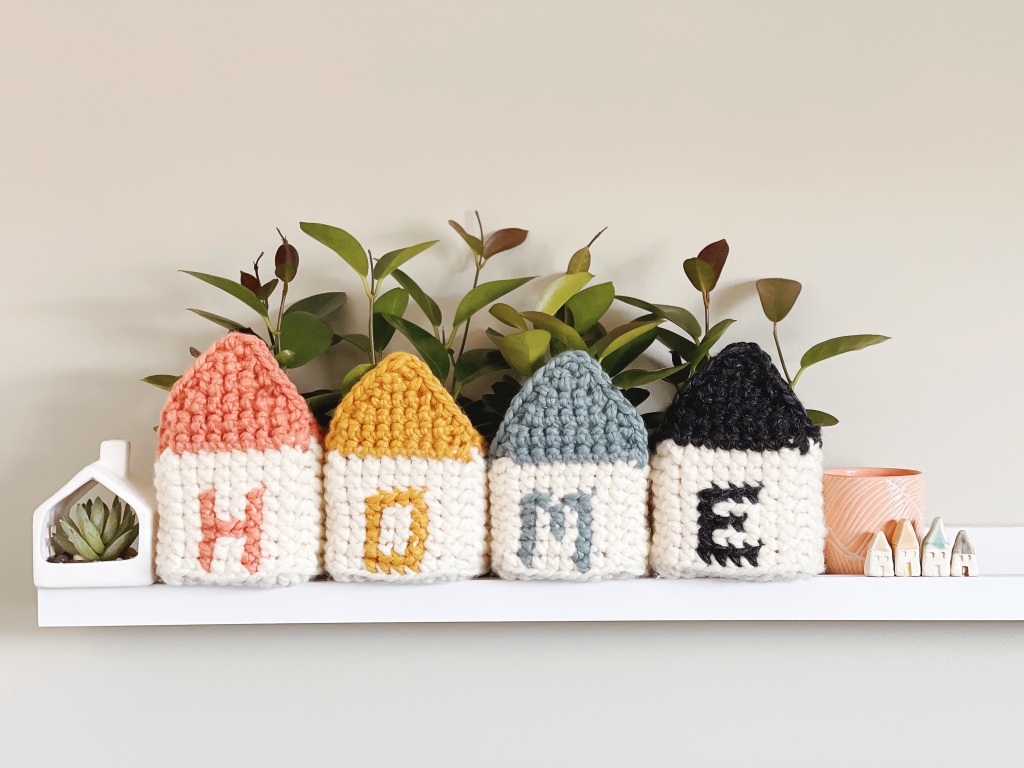
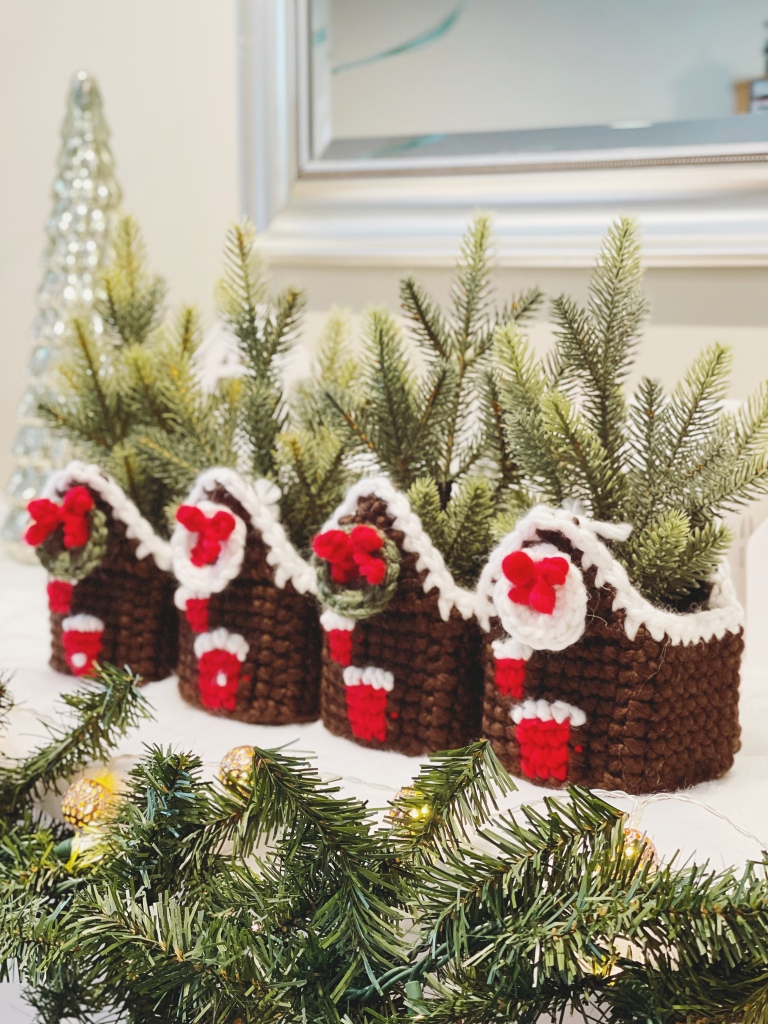
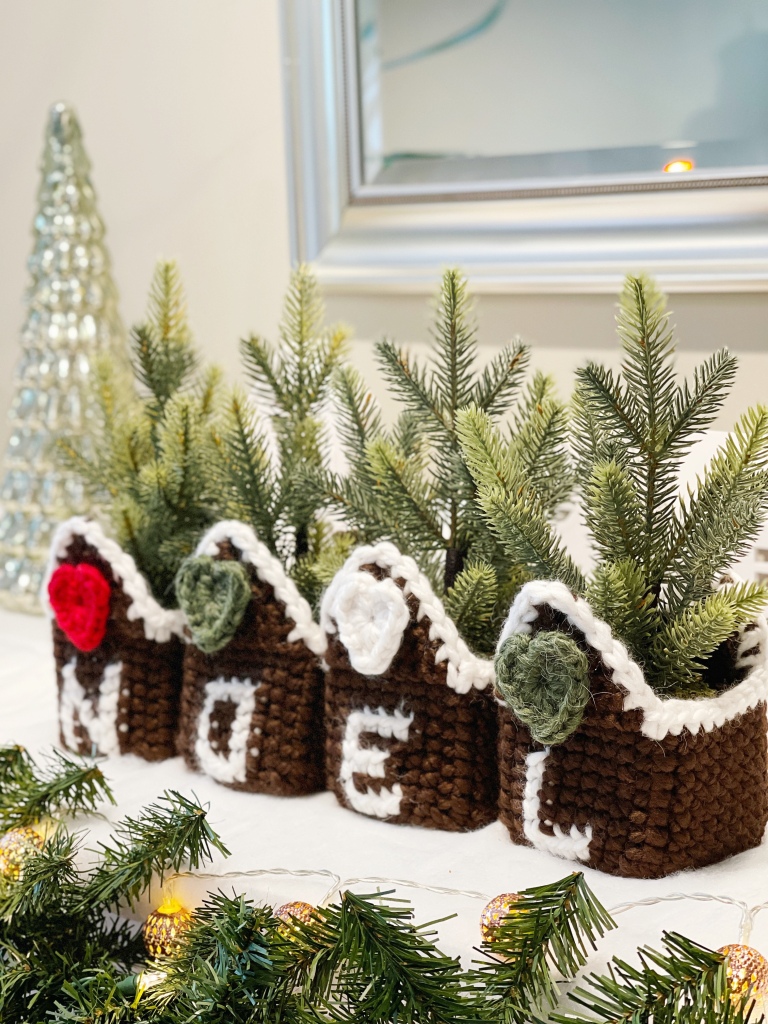
If you’ve been on my Instagram in the past year you know I’m obsessed with my Cozy Cottage planters. My collection of cottages continues to grow, and I’m so excited to add these little gingerbread houses to the mix!
Since I released the pattern for my Cozy Cottage planters earlier this year, I’ve made cottages for all seasons!
Winter:
SpringSummer:
Fall:
But from the beginning I had these gingerbread cottages planned for Christmas! My inspiration for these planters was partially the ceramic village I put up on my mantle for the holidays, and these fit right in!
This post serves as a supplement to my Cozy Cottage Planter pattern and will go over the changes and additions I made for the gingerbread version. So, before you continue reading, go grab the pattern here, then come back and create your own cozy gingerbread cottages for your tiny trees (real or fake!).
Yarn used (per cottage):
-45 yards of super bulky yarn in your brown shade of choice (pictured is Loops & Threads Cozy Wool in Chocolate)
-a few yards of super bulky yarn in white (pictured is Loops & Threads Lush Alpaca in White)
-a few yards of super bulky yarn in red (pictured is Loops & Threads Cozy Wool in Claret)
-a few yards of another color, like green (pictured is Buttercream Alpaca in Green)
I used a 6 mm hook for both the cottage and the wreath additions.
Changes to pattern:
No changes are made until you finish the main body and are ready to move onto the roof. Your brown yarn will be Color A, and then you can choose which colors to make your details with.
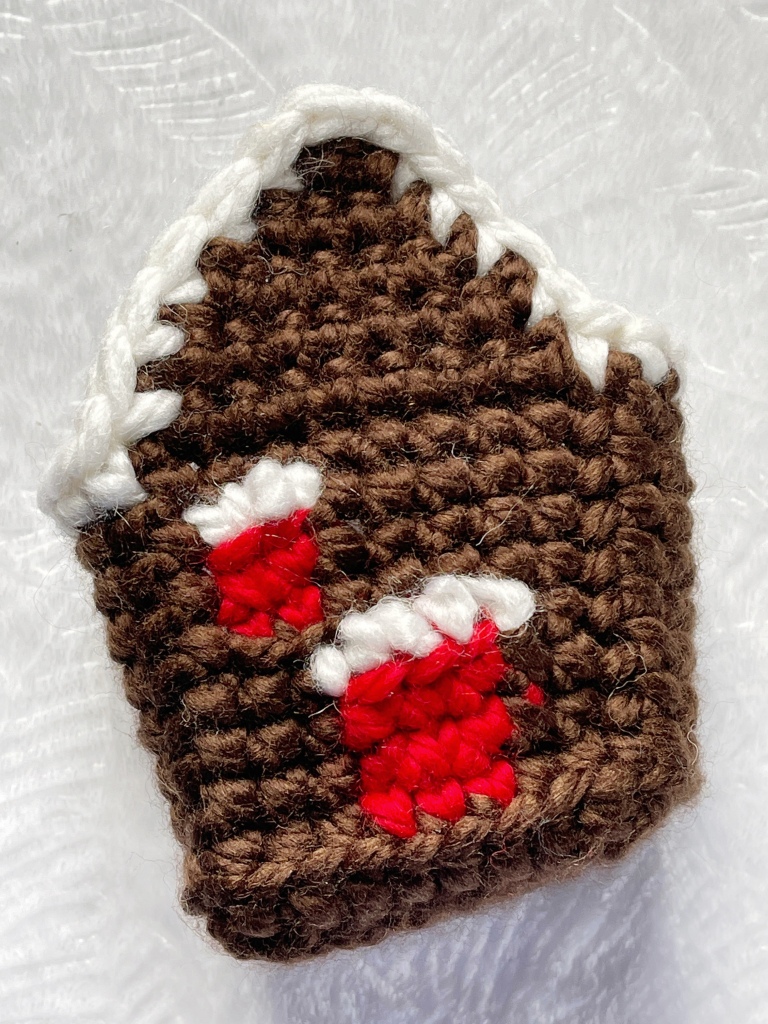
Change to the roof section: Instead of detaching Color A and continuing with Color B, detach and continue the roof section with Color A (brown) per the pattern. Instead of crocheting around the edges of the roof and sides with the brown yarn, detach and complete the second side of the roof up to the edging. Detach brown yarn and attach white yarn to a corner next to a roof side. Single crochet evenly around the roof sides and the cottage sides, then tie off and weave in all ends. Move onto wreaths and details below.
“Icing” on the top of the front window and door:
Using your white yarn, thread a sewing needle and whip stitch along the top of the door and window, keeping the stitches loose and fluffy. Add a doorknob if desired.
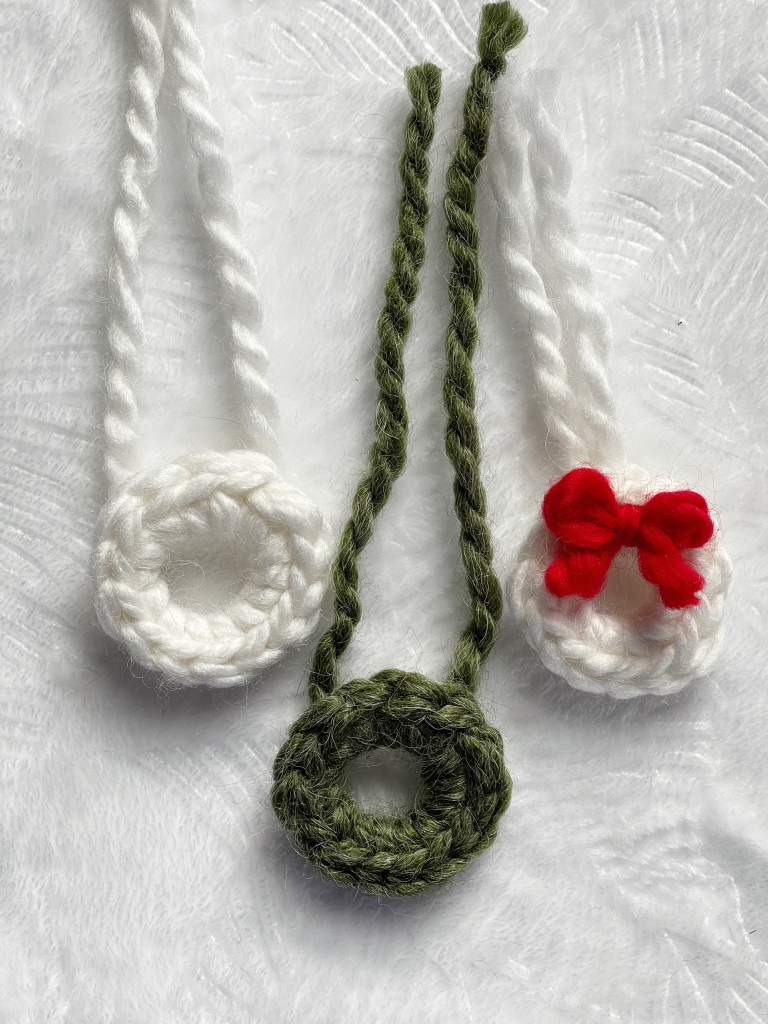
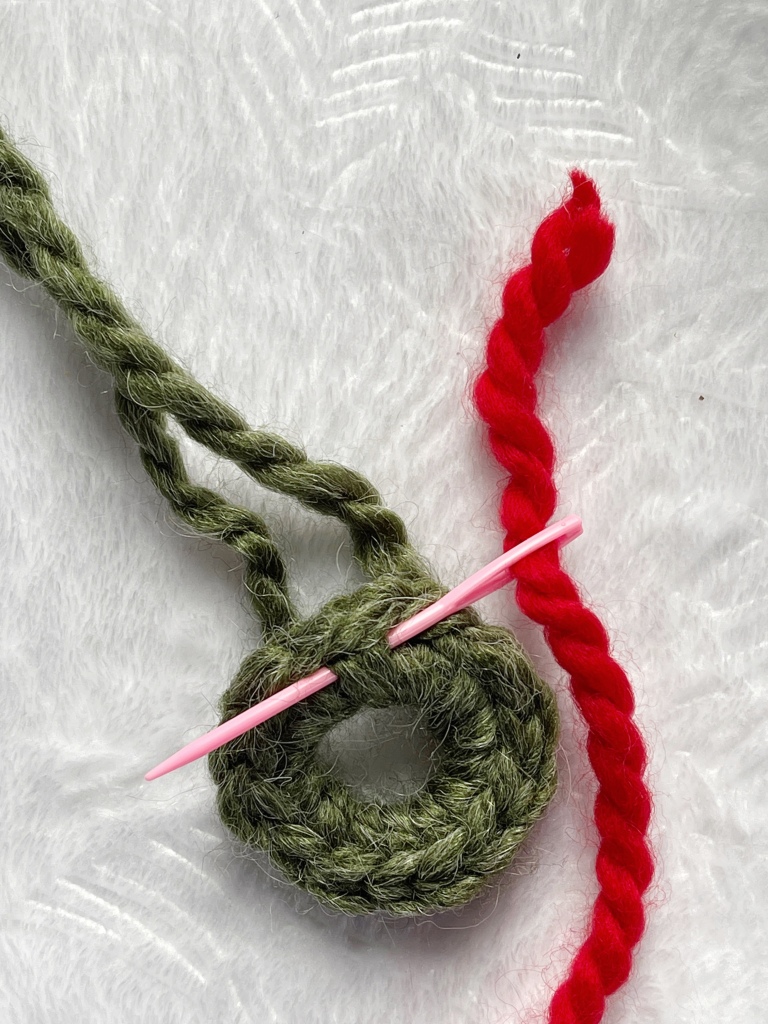
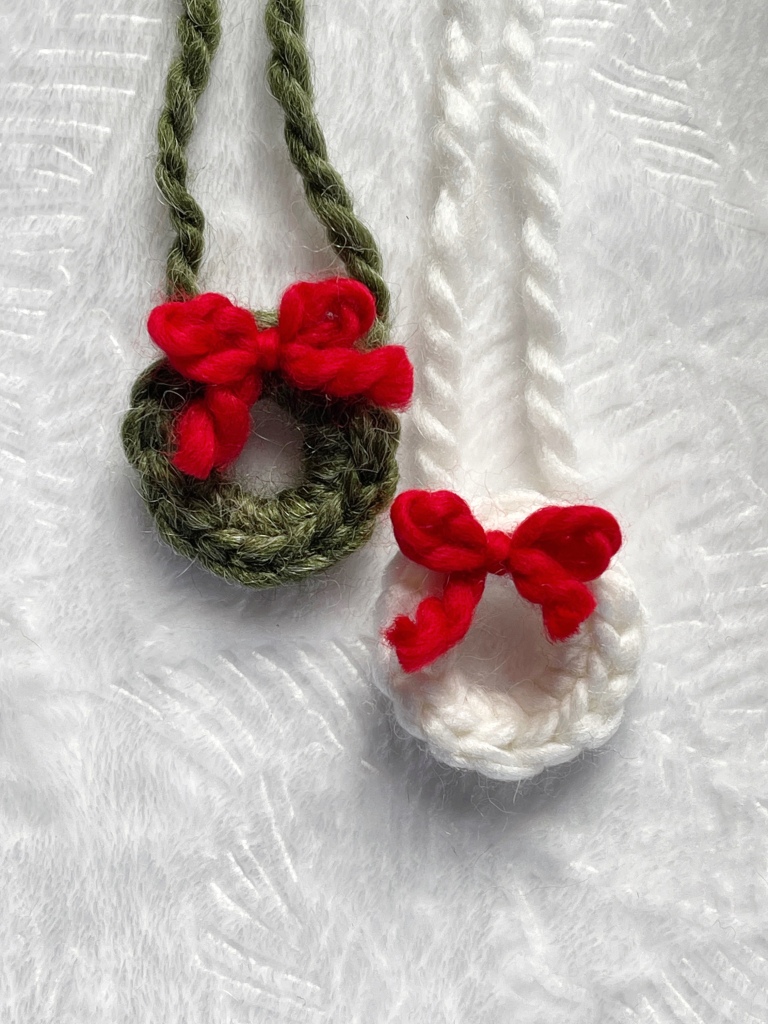
Wreath directions:
Using a color other than brown, make two wreaths for each cottage.
Circle Wreath:
Using super bulky yarn and a 6mm hook, chain 6. Slip stitch to 1st chain to create a ring. Chain 1 and make 14 single crochets inside the chain ring. Slip stitch to the first single crochet and leave a medium length tail. Attach a short strand of red yarn and tie a bow. Attach the wreath to the top of a roof side using the two tails.
Heart Wreath:
Using super bulky yarn and a 6 mm hook, make a magic circle. Into the MC, CH 2, 2 DC, 3 HDC, CH 1, DC, CH 1, 3 HDC, 2 DC, CH 2. Pull magic circle partially closed and slip stitch into the center. Tighten MC and attach wreath to the second roof side using the two tails.
I hope you love your gingerbread cottages as much as I love mine! If you need the link to the pattern, it’s here. And if you make your own cottages, please share them on Instagram with the hashtag #cozycottageplanters and tag me @Februaryskydesigns. Happy Holidays!
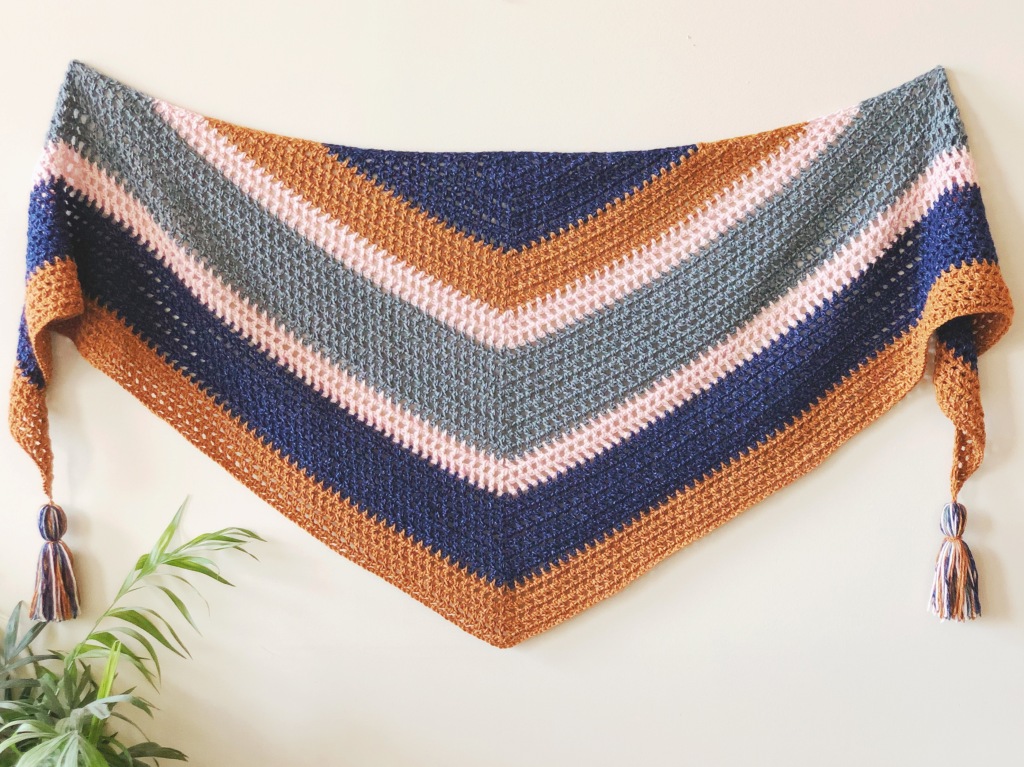
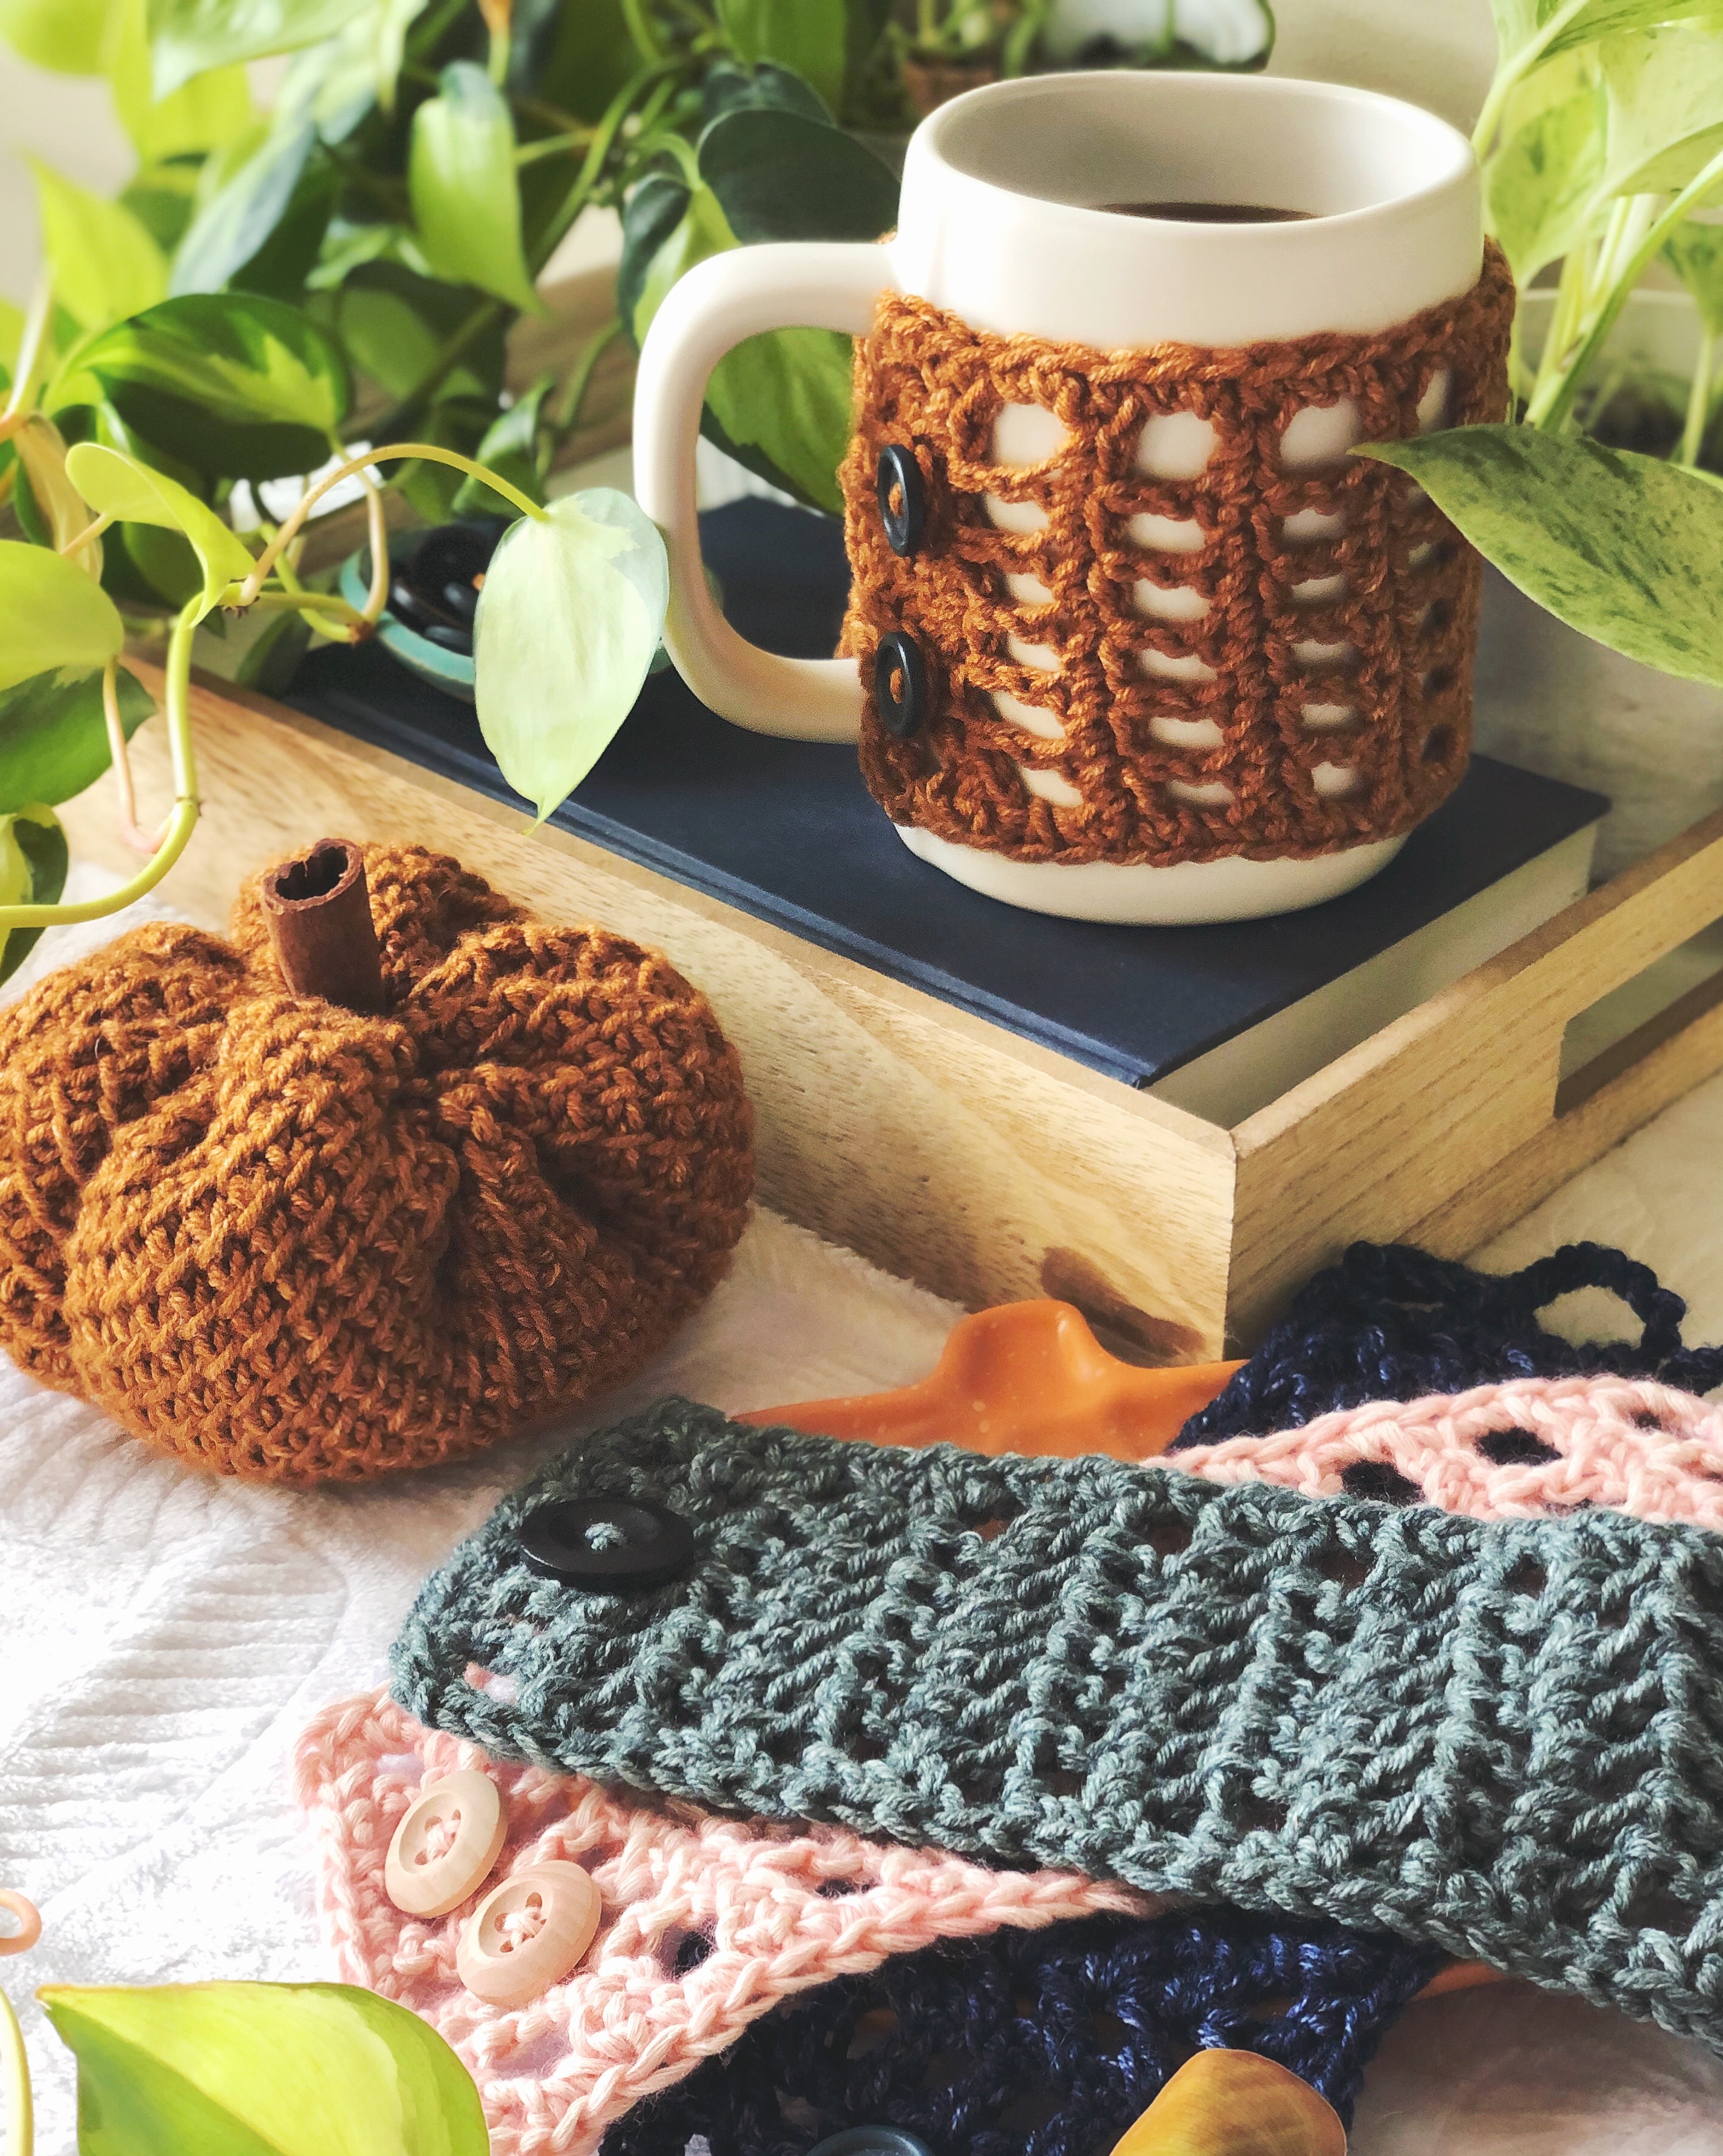
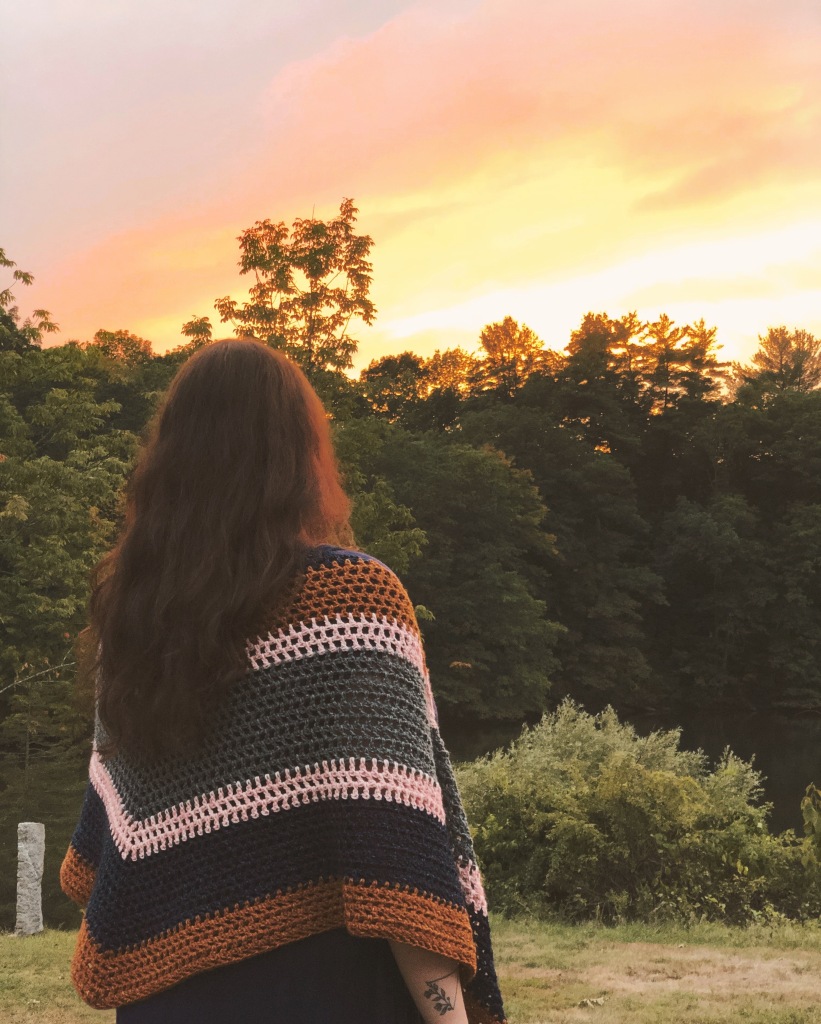
Can you fall in love with a season? I find myself falling in love with all things autumn every year- the cooler weather that turns the air crisp and the leaves golden, not to mention pumpkin spice coffee, warm scented candles, fluffy blankets- to me, this is perfection. I want to savor this season, and creating beautiful accessories that capture this cozy and colorful time of year is how I like to do it! Read on to see how you can create three lovely and beginner friendly patterns that will help you feel the love this fall!
Introducing- the Autumn in Love Trio!
It started out with the shawl- a simple double crochet repeat that really lets the colors you pick become the stars of the show. I chose an early autumn palette using my favorite worsted weight yarn, Lion Brand Jeans, along with a blush yarn I found. The best part of this shawl, besides how meditative the repeats are (this is a perfect Netflix companion project!), is that the color changes happen whenever you feel like it! Grab a few different yarns from your stash and see where your creativity takes you.
Save your leftover yarn to make the next two patterns in the set- the matching hair scarf and mug cozy! The hair scarf uses the same stitches and increase technique as the shawl, and it’s the perfect accessory to tie your hair back while you’re apple picking or on a hayride (okay, I don’t think most people do hayrides every fall- but it gets windy where I live this time of year!). Then when you get home and it’s time for a chai tea to wind down you’ll have the perfect mug cozy to keep your hands cool and your drink warm! These two patterns are so quick, you’ll have them both done in a night!
The written patterns for all three items are below- keep scrolling to check them out!
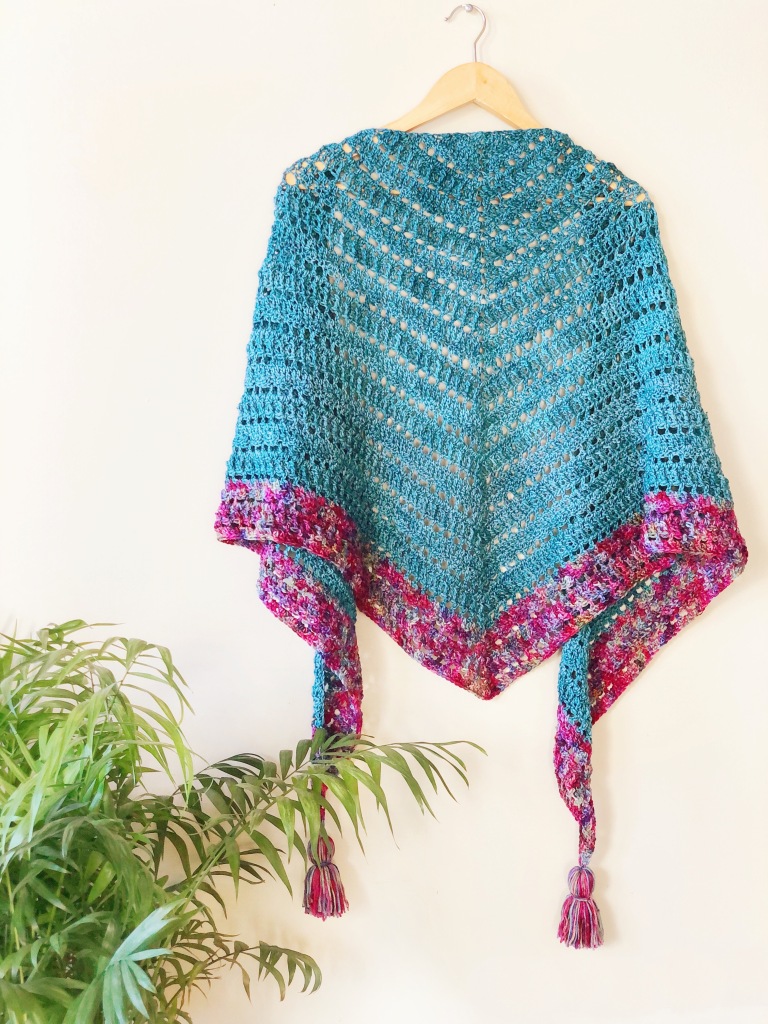
THE AUTUMN IN LOVE SHAWL PATTERN
Have I gushed about this shawl enough yet? The great thing about this pattern is that every row is the same, so once you have the increases down you can sit and relax and watch the shawl come to life. I haven’t put in color changes in the pattern, because those are entirely up to you! You can also use one color and it’ll be equally beautiful-especially after you add tassels!
This wrap is not an equilateral triangle, it’s an isosceles- flashback to middle school geometry, that means the two sides are equal in length and shorter than the base side. This makes a shorter triangle, which will wrap around your neck really well when you wear it in front. That’s my favorite way to style a triangle scarf!
PROJECT SUPPLIES:
Approximately 550 yards of worsted (Level 4) weight yarn, in multiple colors if desired
Size J/10 6 mm crochet hook, or size to match gauge
Scissors
Yarn Needle
GAUGE: 8 x 8 rows of pattern = 4″, 10 cm
SIZE: 80″ (203 cm) long by 24″ (61 cm) from top edge to bottom of triangle
TECHNIQUES USED:
Magic Circle (MC)
Chain (CH)
Double Crochet (DC)
PATTERNNOTES:
The pattern starts with a Magic Circle. One way to do an MC is to wrap the yarn in an “X” around your hand. Working into the top two strands of the X, push your hook under the first strand, grabbing the second strand and pulling it under the first strand. Take the loop off your hand, being careful to keep the loop on your hook. Begin R1.
Each row of the shawl has an equal number of DC’s and CH’s. For example, R1 has 6 DC’s and 6 CH’s, 12 stitches total.
The CH 4 at the start of each row counts as 1 DC and 1 CH. The CH 2 in the center of each row counts as 2 stitches.
The DC’s of each row after R1 are worked in the CH spaces of the previous row.
The center of each row after R1 has the same *DC, CH 2, DC* worked in the CH 2 space of the previous row.
Each row is increased by 8 stitches. There are 3 extra stitches on each end and 2 in the center. The first increase is made by chaining 4 (counts as 1 DC and 1 CH) and then working a DC in the first DC from the previous row. You then chain 1 and work a DC in the very next chain space. The other end is increased by working a *DC, CH, DC* into the 3rd chain of the turning CH 4.
PATTERN INSTRUCTIONS:
Using a 6mm hook, begin with a Magic Circle (see notes).
Row 1: CH 4. Working into MC, DC, CH, DC, CH 2, DC, CH, DC, CH, DC. (12 ST, 6 DC and 6 CH)
Row 2: CH 4. DC in the 1st DC of the last row. CH, DC in 1st chain space. CH, DC in next CH space. CH, in the CH 2 space from the previous row, *DC, CH 2, DC*. CH, DC in next CH space, CH, DC in the CH space made by the CH 4 of the previous row. In the 3rd CH of starting CH 4, *DC, CH, DC*. (20 ST, 10 DC and 10 CH)
Repeat Row 2, with a DC in each CH space along each side, for a total of 46 rows, or until the shawl has reached your desired size. Keep it monotone, or change up the colors at the end of a row to create stripes! The options are endless.
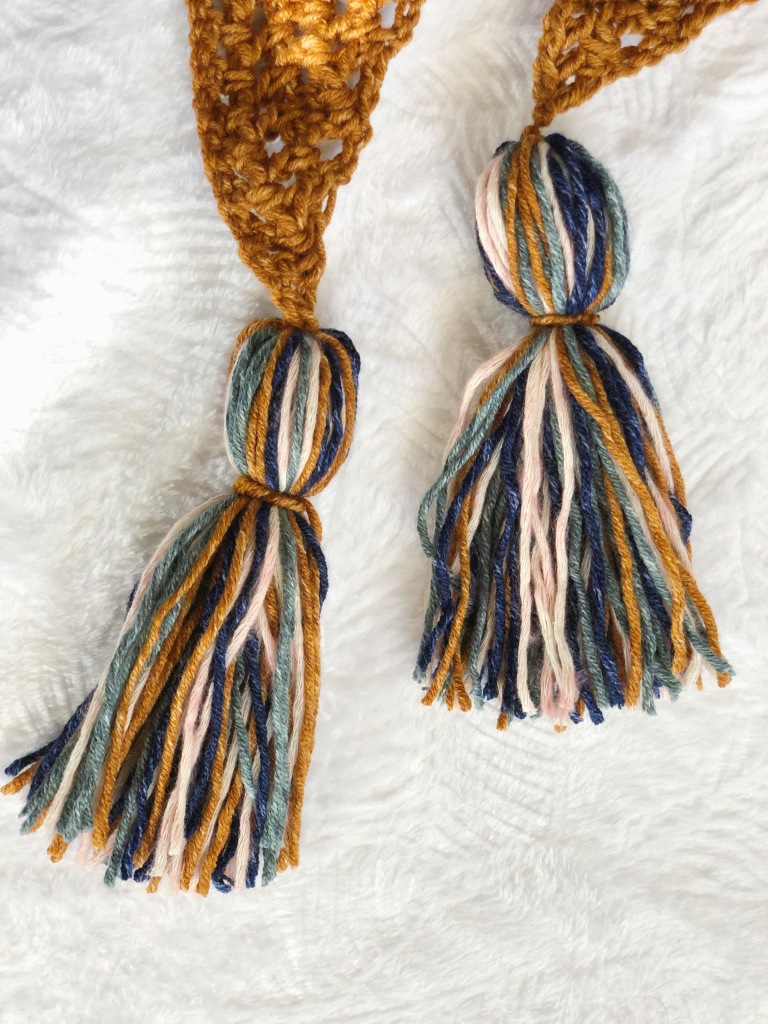
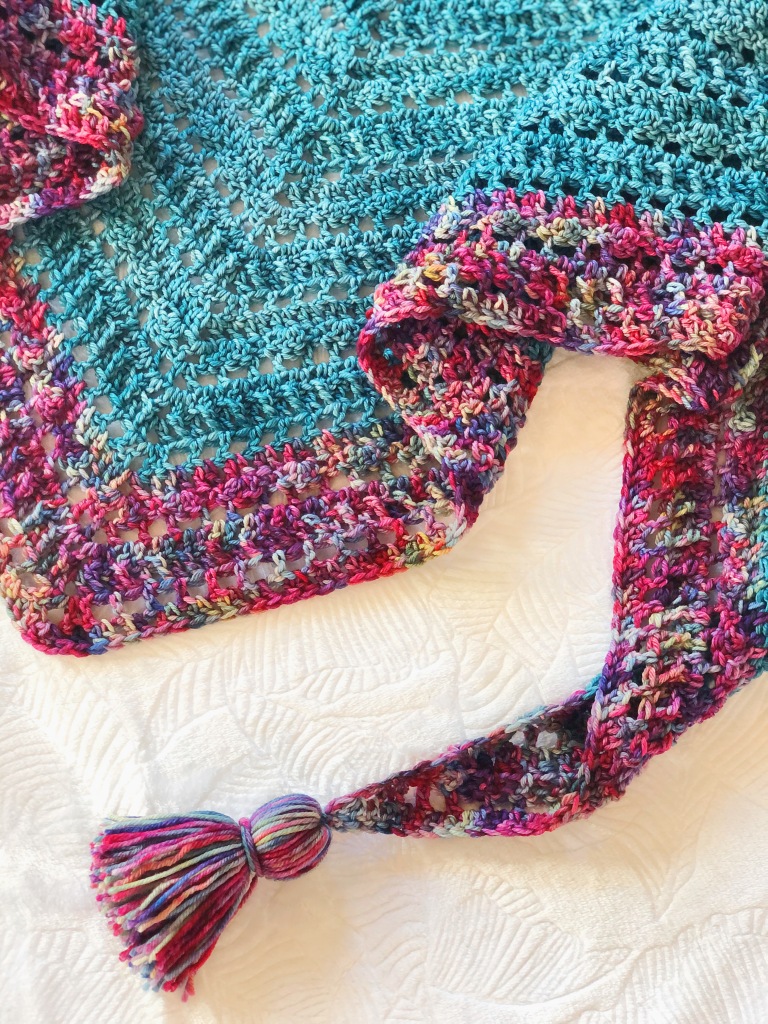
Don’t forget the tassels! (See below.)
TASSELS:
You’ll create two tassels and attach them to each ends of the shawl.
Step 1: Using any color worsted yarn, cut 4 16″ lengths.
Step 2: Using a 9″ book, wrap 1 strand of yarn around 60 times (or hold 4 strands together and wrap 15 times).
Step 3: Slip yarn off book and use a 16″ yarn piece to tie a couple knots in the center of the yarn. Cut the loops on either end of the bundle.
Step 4: Fold the bundle in half so the ends are together. Using another 16 in. length, tie a few knots about 1.5″ from the top.
Step 5: Trim the ends so they’re even and attach the tassel to the end of the shawl securely.
Repeat steps for second tassel.
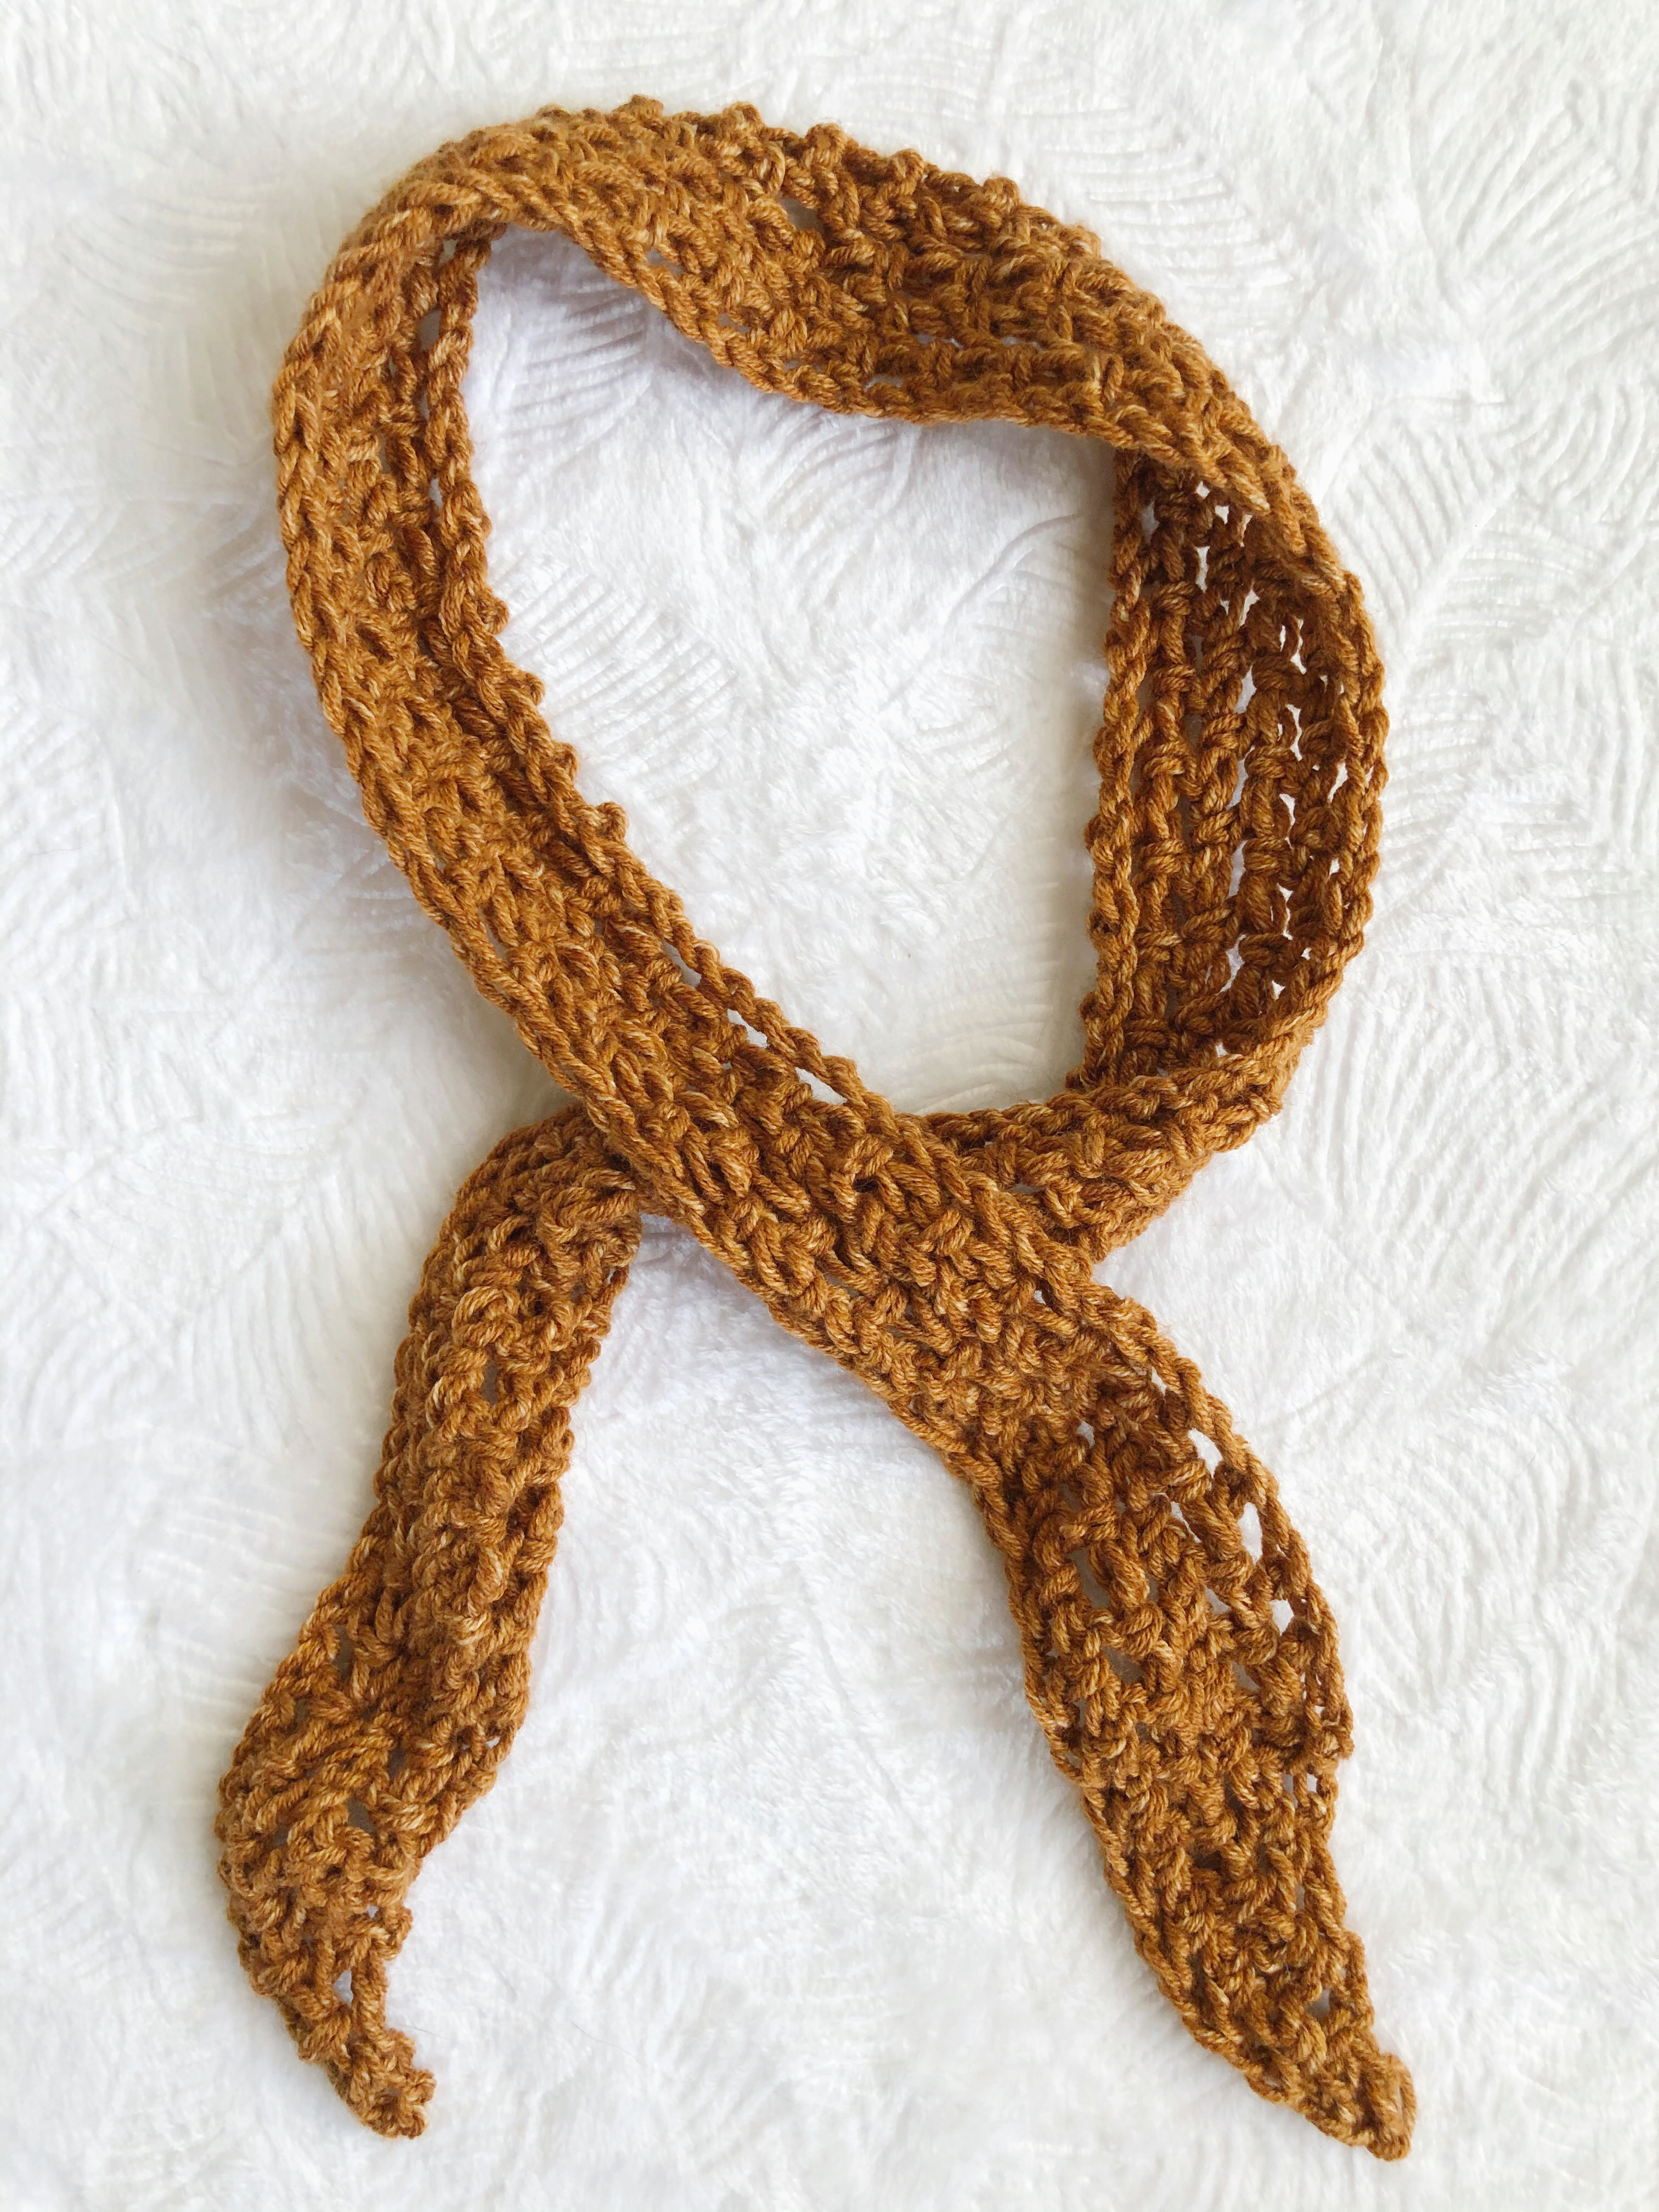
THE AUTUMN IN LOVE HAIR SCARF
Have you worn a hair scarf before? There’s no one correct way to do it- if you can think it up, you can wear it! I like to wear it as a headband, but I think it’s really cute as a bow too. You can even tie it to the strap of a bag as a pop of color!
PROJECT SUPPLIES:
Approximately 50 yards of worsted (Level 4) weight yarn
Size J/10 6 mm crochet hook
Scissors
Yarn Needle
SIZE: 33″ long by 2.5″ wide
STITCHES USED:
Chain (CH)
Double Crochet (DC)
PATTERNNOTES:
The scarf is 33 inches long and will stretch when worn. To make it longer or shorter, change the starting chain by adding or subtracting 5 chains (always an odd number). To make it wider, continue adding rows past row 5 (knowing it will increase the length as well).
The DC’s of each row after R1 are worked in the CH spaces of the previous row.
The CH 4 at the start of each row counts as 1 DC and 1 CH.
Each row is increased by 6 stitches. There are 3 extra stitches on each end. The first increase is made by chaining 4 (counts as 1 DC and 1 CH) and working a DC in the first DC from the previous row, then chaining 1 and working a DC in the next chain space. The other end is increased by working a *DC, CH, DC* into the 3rd chain of the turning CH 4.
PATTERN INSTRUCTIONS:
Using your 6 mm hook, CH 111.
Row 1: DC in 5th CH from the hook. *CH 1, skip the next CH, DC*. Repeat from * to * to end of chain, making sure you end with a DC in the last CH.
Row 2: CH 4, DC in the 1st DC, CH, DC in the CH space directly next to the 1st DC from the previous row. *CH, DC in next CH space*. Repeat from * to * across until you reach the starting CH 4. DC in the space made by the starting CH 4, CH, *DC, CH, DC* in the 3rd CH of starting CH 4.
Rows 3-5: Repeat Row 2 for 5 total rows. Cut and weave in ends.
THE AUTUMN IN LOVE MUG COZY PATTERN
I’ll admit, I’m an iced coffee every morning kind of girl- but in the evenings you can find me with a mug of hot tea more often than not! I love these little coordinating mug cozies because not only are they cute, but they’re also functional- no one wants to burn their hands on a hot mug! These use just a bit of yarn and whichever cute buttons you have on hand. They’d made great gifts or craft fair items. That is, after you’ve made a couple for yourself!
PROJECT SUPPLIES:
Worsted (Level 4) weight yarn
Size J/10 6 mm crochet hook
Scissors
Yarn Needle
Two .5″ buttons
SIZE: 10″ by 3.5″
STITCHES USED:
Chain (CH)
Single Crochet (SC)
Double Crochet (DC)
PATTERNNOTES:
The CH 4 at the beginning of Row 3 and each repeat counts as 1 DC and 1 CH.
Pattern as written fits a large mug, about 5″ tall and a 3.5″ diameter. For a taller mug, add to starting chain in multiples of 2 (always an odd number). For a thicker mug, continue repeating Rows 2 and 3, ending on a Row 3.
PATTERN INSTRUCTIONS:
Using your 6mm hook and worsted yarn, CH 15.
Row 1: DC in 5th CH from the hook. *CH, SK, DC in next CH*. Repeat to end. (7 DC, including starting CH 4)
Row 2: CH 1 (does not count as a ST). SC in each DC and CH space across, ending with a SC in the 3rd CH of the starting CH 4. (13 SC)
Row 3: CH 4. Skip first 2 SC, DC in 3rd SC. *CH, SK, DC* across, ending with a DC in the last SC. (13 ST, 7 DC)
Repeat Rows 2 and 3 for a total of 23 rows (ending on a Row 3).
Edge: CH 1, SC 4, CH 10, SC 5, CH 10, SC 4 (end of top edge).
CH 2, turn the corner, SC 2 in each DC row and SC 1 in each SC row. (35 SC)
CH 2, turn to the bottom edge, SC across. (13 SC)
CH 2, turn to last side, repeat SC pattern from 2nd side. (35 SC)
CH 2, slip stitch to the 1st SC of the top edge. Fasten off and weave in ends.
Buttons: Sew two buttons to the opposite side of the cozy from the CH 10 loops, spacing them so the buttons have 3 DC’s between them. Fasten off and weave in the ends.
Thank you for your support (just by being here!), and I look forward to seeing your creations on Instagram- be sure to tag me @FebruarySkyDesigns and tag your pics with the hashtag #autumninlovepatterns!
This is an original pattern by Christina of February Sky Designs. Please do not claim this pattern as your own. If you wish to share this pattern, you may link to it but please do not reprint it on your site or sell it.
You may sell products made from this pattern but please clearly credit the design to me, Christina of February Sky Designs, and link to my blog februaryskydesigns.com. Thank you for respecting creators and their work!
I am so excited to introduce the Pisces Shawl! Get the crochet pattern now on my Etsy!
This pattern joins my February Sky Scarf in my February patterns, and this one has a very special place in my heart. It’s my first shawl pattern, and I knew I had to make it perfect- drapey, detailed, and a long triangle shape that works as a wrap or as a cozy scarf. This hits all the marks!
This shawl uses a few different techniques, like double crocheting clusters and triple crocheting into the front post of the previous row. But don’t let that put you off- this pattern is advanced-beginner friendly, and I wrote the row repeats so that once you get a few rows done and understand the repetitions you’ll be able to breeze through this project.
If you are used to only working with worsted weight yarn, this is a great project to try DK weight! It’s a little lighter, but you can still use a larger hook so the shawl has tons of drape and works up quickly. I made two shawls, one in Malabrigo Arroyo yarn (pictured above in “Reflecting Pool” and “Anniversario”) and one using Lion Brand Mandala in Warlock (below).
The pattern is available on my Etsy. I hope you’ll try this pattern! When you do, be sure to tag me on instagram @februaryskydesigns and use the hashtag #piscesshawl!
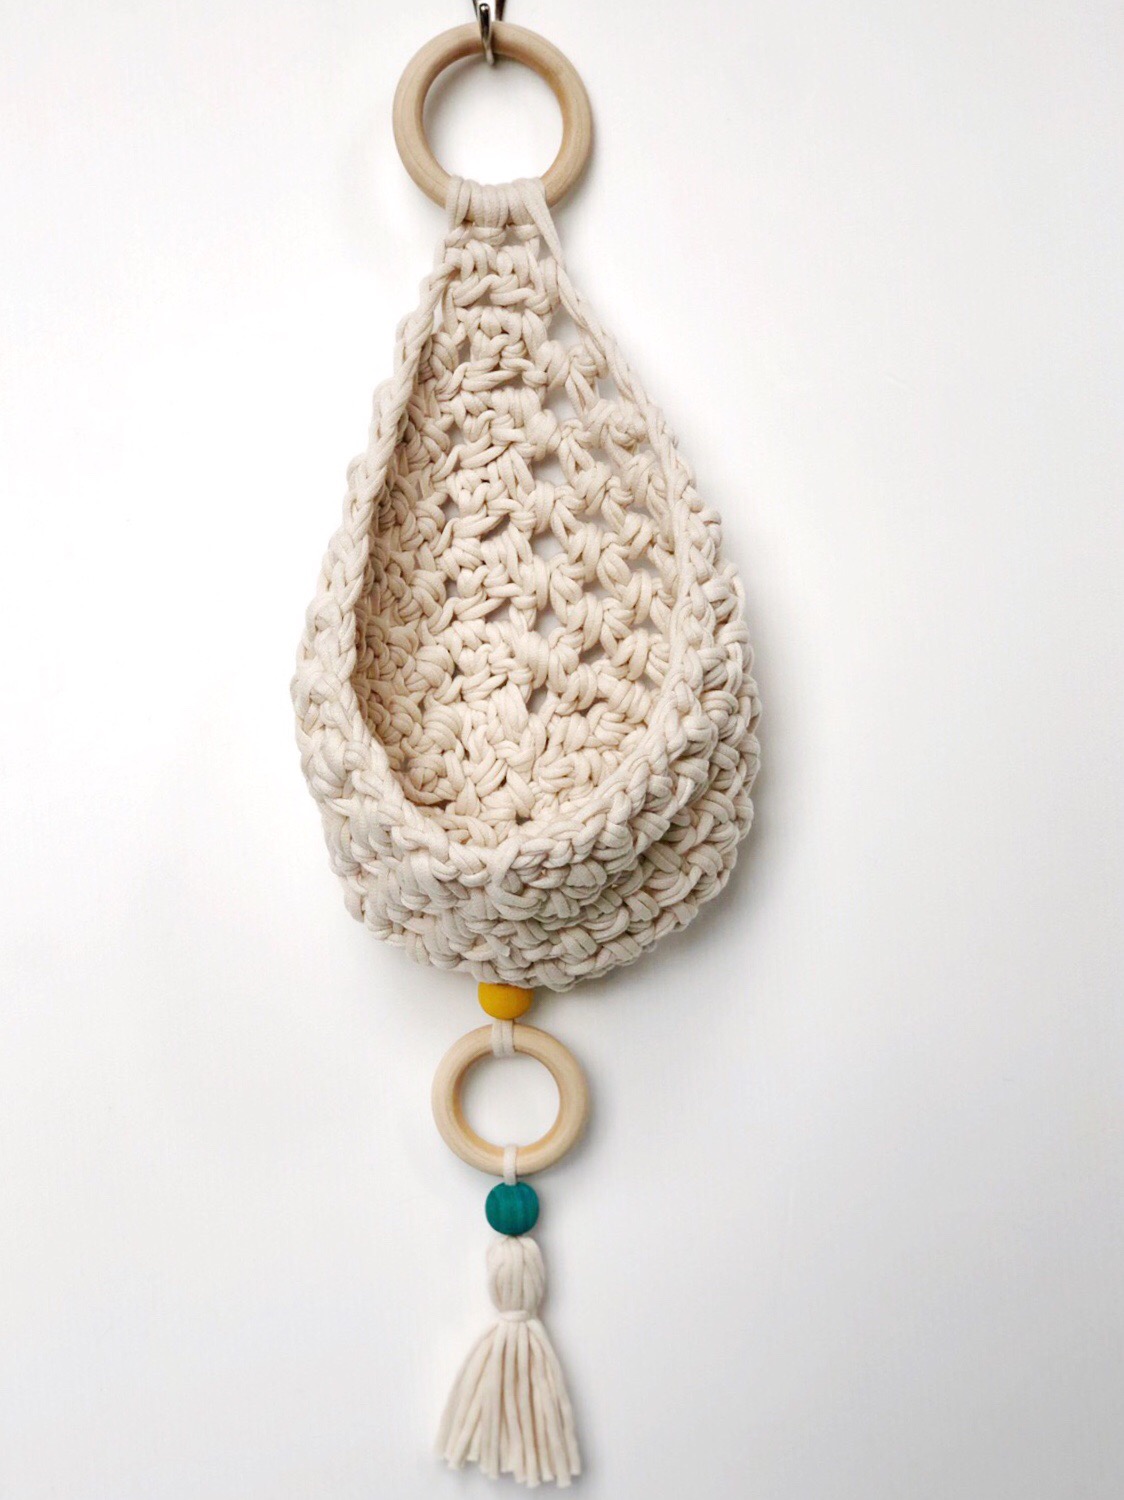
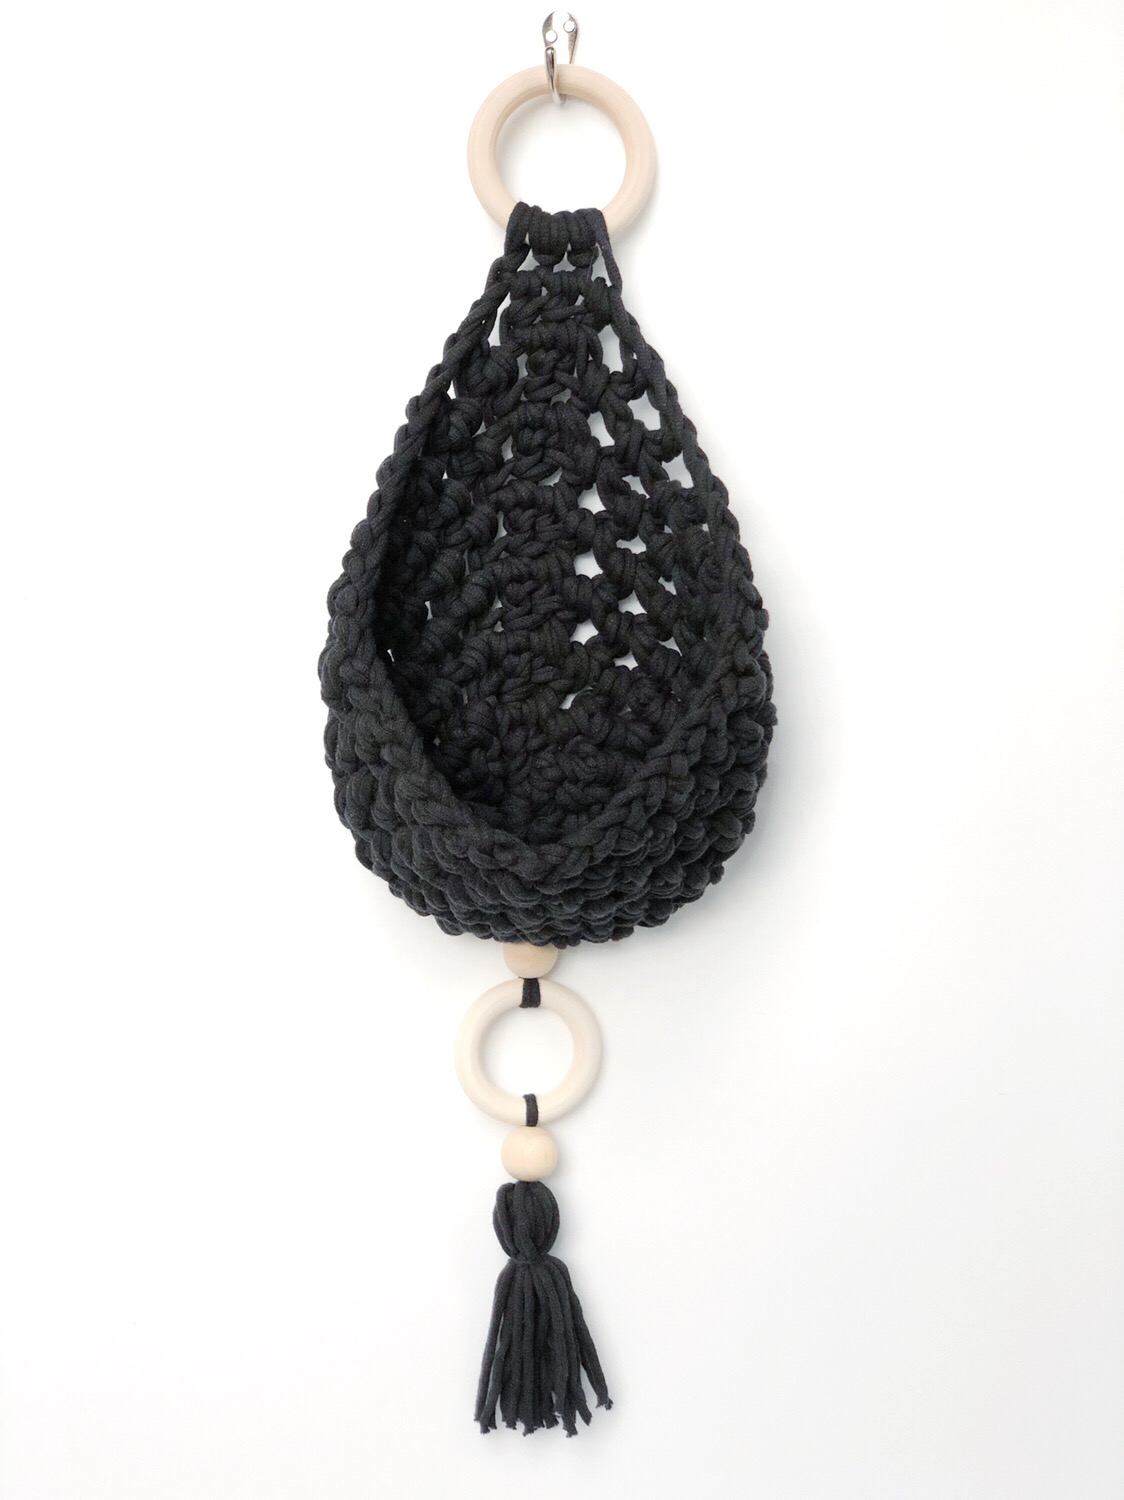
I live in a small apartment and my love for plants has meant that 90% of the available surfaces are covered in lovely green things. Unfortunately I need that other 10% free to sleep and eat on, so I designed this cozy little plant hanger so I can make use of my walls and keep this plant addiction going.
You can find a beautifully formatted, 6-page PDF in my Etsy shop with full color pictorials and step by step instructions.